Becoming a Hawaiian Style Cafe
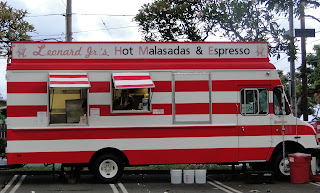
In January 2022 Buzz's Hawaiian Grill took possession of 3457 Magnolia Ave. for the future Buzz's brick-n-mortar. For several years prior the space was a well loved hot dog joint that had decided to move to a new location. Buzz's had been looking for a space that shared our chill vibe and this space checked all the boxes. The challenge was, how to convert the space from ketchup red to an island style cafe with a plantation era look. A place people from Hawai'i could relate to.
The other challenge was to upgrade the kitchen from dysfunctional and partially operational, to a fully operational kitchen capable of handling the complex menu we envisioned offering. It was going to require time and money, but we had a vision we felt was achievable.
The Front End
One of the main goals was to remove the barn style false ceiling in order to open the space up visually allowing more light in. After all, Hawaiian restaurants are often open air and definitely bright and full of sunshine.
The best cafes in Hawaii are open air, birds fly in and steal your toast.
Most have picnic tables to share with strangers and enjoy the weather. Even if
a rain shower passes through you don't really care. It's how life is in the
islands. We had to find ways to open up the space.

From what we know the space was once a confectionery, then a
thrift/antique-ish store and then closed for several years before Steve's
hotdogs moved in. Some of the neighbor's have lived in the area long enough to
recall the past tenants. We hoped they would approve of what we had planned
for the space's next chapter. Fingers were crossed.
 The front door was walled in including the ceiling portion that was just under 3' in height. (see far right image)
This false ceiling and entry way walls were the main contributor to closing in the store's front end restricting the light and creating dark shadows. (see middle image) The low ceiling served no purpose but to visually crowd the vision both from the front looking out and from the outside looking in. (see far left image) It's difficult to see the full effect of this without looking hard at the middle image where you can see the tunnel effect around the front door. Especially the low ceiling over the door.
As the skin to the structure encasing the front windows and door were removed we were shocked to
find a transom buried above the door, and five large windows with matching ribbed glass. (see top left image) Another great find is the original tin ceiling covered by the drop ceiling. (see image below) If we owned the property we would have removed the entire drop ceiling to expose the original tin ceiling, but with a short lease it was not feasible.
Imagine how much the rework did to changed the entire space. The previous ceiling was low enough to completely hide the transom much less the upper windows. The low ceiling and walls blocked light into the first 6 feet of the dining room. The natural sunlight will altogether change the space.
Once the entryway structure was removed new framing was installed using wood removed from the structure itself. The windows and entry door were also trimmed out using scrap wood.
The upper windows were partially covered to provide a smooth wall the drop ceiling will ultimately butt up to. The transom (four small windows) above the door was removed to be refinished and replaced with a temporary piece of plywood. It's not easy to distinguish in the photo below right, but the last eight feet of the drop ceiling doesn't exist because this is the void left when the front end structure was removed.
The Back End
The main task on the back wall was to enlarge the space above the stairs to the bathrooms. As seen in the picture on the left, below the header above the entry to the kitchen, and the bathroom goes straight across on the same plane. (see white arrow) This caused the entry to the bathrooms to be much too low as a person would climb the three steps up to the bathroom landing.
Once again it was discovered this wall too didn't have a load bearing purpose and could be removed.
By raising the entry way just a foot or so made passage to the bathrooms much safer for anyone close to 6' tall. It also opened the space to provide more light making the bathroom area brighter and more inviting.
Again we used trim that had been removed from the front door project to trim out both sides of the entry to the bathroom and kitchen.
The Exterior
The exterior wood was in poor shape. The work needed to be scrapped , sanded and cleaned of any loose and peeling paint. Some holes needed to be filled.
Working on the project in January meant the exterior had to be worked on in spurts. Winters in St. Louis are all over the temperature spectrum from near zero to 60 degrees When we'd get a warm day we'd drop what we were working on and focus on the exterior. The "we" I'm referring to was my brother John and I. John's usually drug into all the wild ideas I come up with. Bless his heart he worked tirelessly on this renovation project.
The image in the above middle shows the transom we discovered when removing the inside entryway. The images above left and right show are a good shot at what the exterior looked like with the transom covered up. Who would have thought such a beautiful part of history was being forgotten underneath the skin of the front door.Keep in mind the five larger squares running across the top are where the five large windows exist, but a still covered. Future project?
The Kitchen
The front of house was the enjoyable part of this process. While it was weeks of dust in our eyes and climbing up and down ladders, it was the portion of the project that was going to be viewed by customers and have the most impact of whether we succeeded in creating a cafe that looked like something you would wander into in Hawaii.
The kitchen on the other hand was going to be your run of the mill commercial kitchen. We had three goals to accomplish, none of them very exciting. First goal, maximize the space. The small kitchen was barely large enough to accommodate our operation. We needed to find ways to enlarge the space wherever possible in order to create a well functioning operation. A lot of people are going to be working elbow to elbow so it's important we are wise about the kitchen layout. Second goal was to create a kitchen we enjoyed working in. If we want our customers to taste our love for Hawaiian food, the kitchen needed to be a place we loved to cook in. The third goal was to create a commercial kitchen that would pass health standards and would be easy to keep clean.
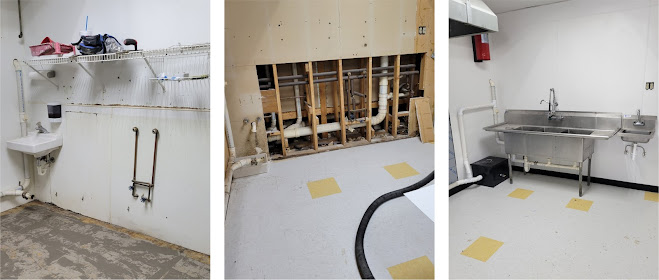
As you can see from the images above, what lay ahead was a project that would involve replacing the kitchen grade wall board and flooring. The water heater was situated in a prime location taking up too much valuable floor space. It also prevented the vertical space above it to be used effectively. We knew in order for this space to house the equipment and supplies required for our operation we would need to maximize the vertical space. The building doesn't have a basement which meant the water heater needed to be moved up high out of the way.
A platform was built above the utility sink to support the water heater. This would allow for a badly needed prep sink to be added to the kitchen in it's place. The window above would be framed in and walled over so shelving could be added providing that vertical storage mentioned.This image to the right shows what the space looks like once the water heater was moved and the prep sink installation completed. This image also jumps forward to when the new floor was installed. We'll cover the flooring later.
Meanwhile, on the opposite side of the kitchen another plumbing project was underway. The old porcelain hand washing sink was situated in a corner where it would be very difficult for employees to access as often as kitchen staff must wash their hands.
The wall was skinned back to expose the plumbing and reworked so the dish washing sink was placed in the corner where a single person washing dishes would be out of the way of other staff traffic. The hand washing sink was positioned to the right of the dish washing sink which places the hand-washing sink virtually in the middle of the kitchen with great access to all staff. Hand washing is essential to good food safety. The more accessible this sink is the more often staff will wash their hands.
The far right image below fast forwards to a time when the new FRP walls and flooring have been installed giving you a peek at where the kitchen is heading.


Comments
Post a Comment